Painting a popcorn ceiling is one of the quickest ways to brighten up a room and cover old stains. But getting a perfect, pro-level finish depends on three things. You need to check for safety issues, prepare the surface the right way, and use the correct tools.
Get these steps right, and you can avoid common problems like peeling texture and an uneven, blotchy look. This guide will show you how to paint popcorn ceilings and get amazing results for your home in Salinas or Monterey.
Your Guide to a Freshly Painted Popcorn ceiling
Fixing up a dated popcorn ceiling can be a big win. It makes a room feel cleaner, bigger, and more modern right away. But that bumpy texture needs a special touch compared to painting a flat wall.
Many older homes, especially in areas like Monterey and Salinas, were built when popcorn ceilings were popular. This means some of them might contain asbestos, a harmful material used in construction before the 1980s.
Safety First: If your home was built before 1980, you must test for asbestos before you do anything. Touching materials with asbestos can release dangerous fibers into the air. Using a home test kit or hiring a pro is a must-do first step.
Planning for a Pro-Quality Look
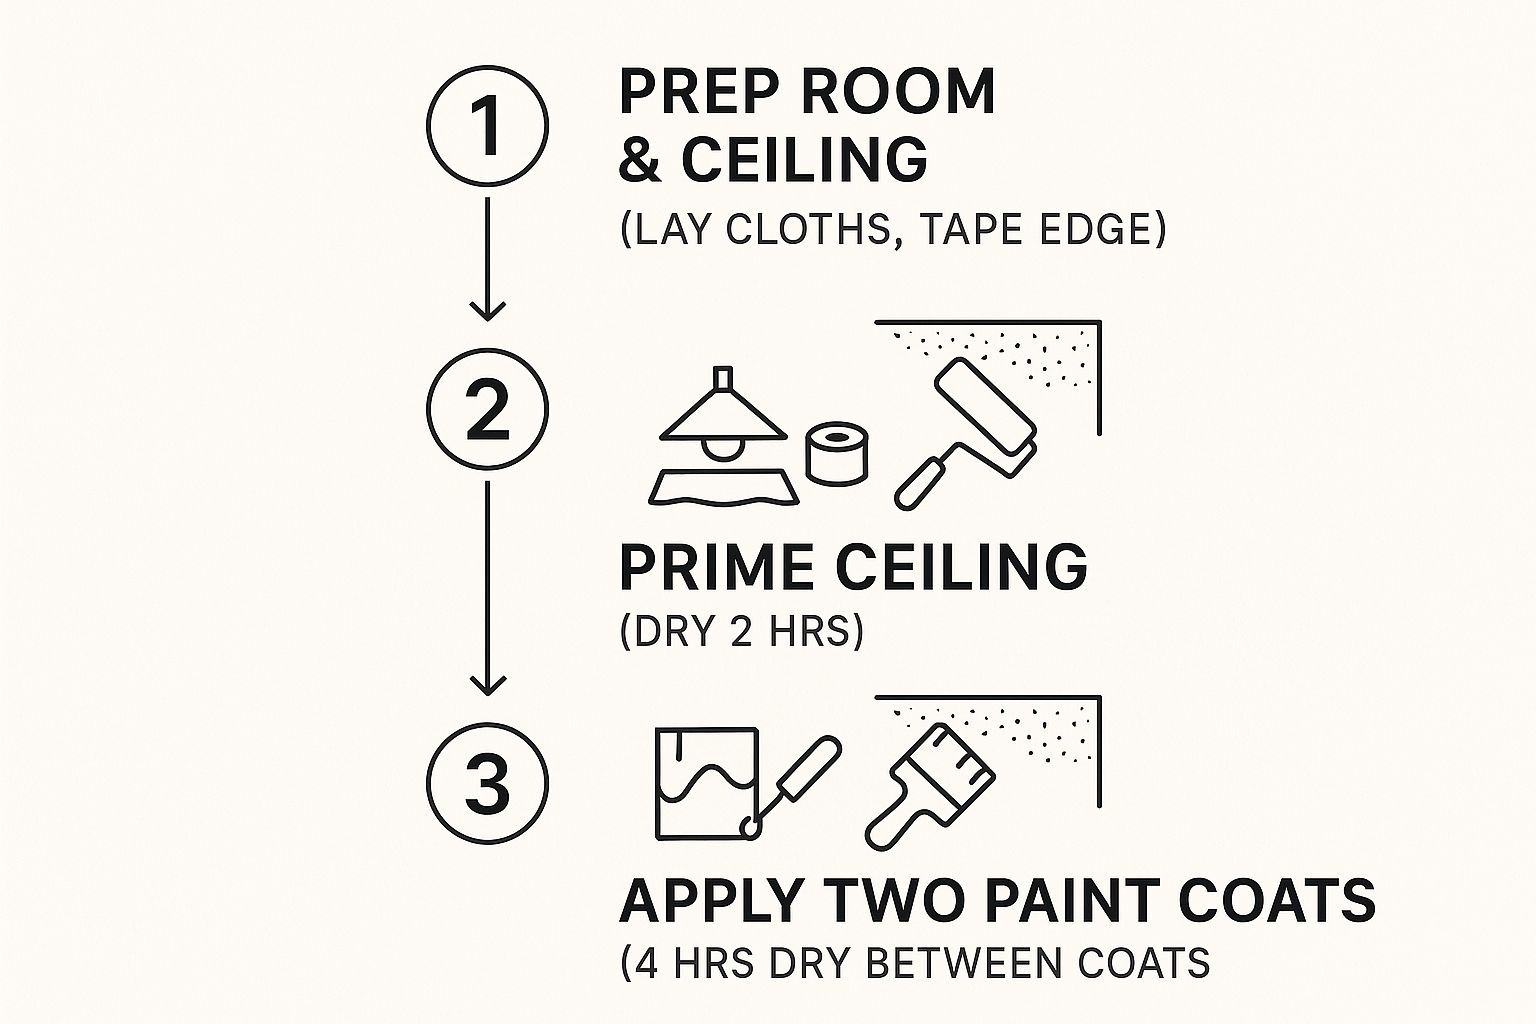
Once you know the ceiling is safe, the real work can start. Good preparation is the key to success. This is more than just covering your furniture. It’s about making sure the paint sticks without pulling the texture off the ceiling.
A great paint job needs more than just a roller and some paint. Here is what you should think about:
- Clean the Ceiling: Gently remove all dust and spiderwebs without hurting the texture.
- Fix Small Problems: Patch any small cracks or old water stains before you start priming.
- Choose a Color: The right paint color can change the whole feel of the room. If you need help, learn how to choose interior paint colors.
- Pick the Right Primer and Paint: You need products made for bumpy, absorbent surfaces. Regular wall paint won't work.
Taking time on these first steps will save you from big problems later. A well-painted popcorn ceiling will look great for years.
Setting Up Your Room for a Clean Project
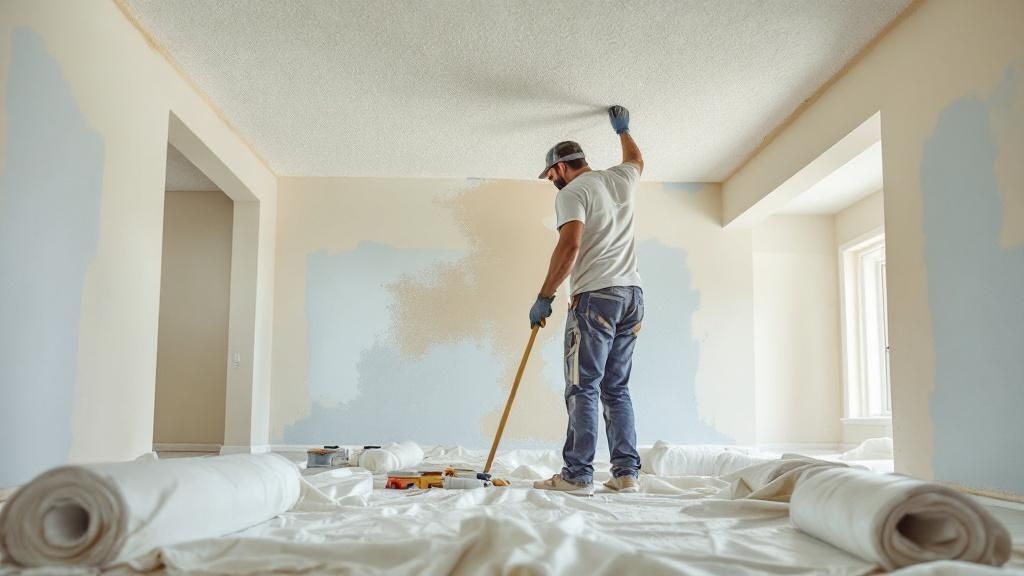
Let’s be real: painting is messy. But tackling a popcorn ceiling is on another level. This isn't just about a few paint drips. Proper prep is what separates a great finish from a DIY mess.
The bumpy texture on these ceilings can hold a lot of paint and fling it everywhere. A good setup will save you hours of cleanup time.
First, clear the room of all furniture if possible. For heavy items you can’t move, push them to the center of the room. Then, cover them completely with thick plastic sheets.
Protecting Your Floors and Walls
Next, it's time to protect your floors and walls. Don't just throw down one sheet of plastic. We've seen that mistake lead to stained carpets and ruined floors in homes around Salinas.
To create a strong barrier, follow these steps:
- Cover the entire floor with plastic sheeting, overlapping the edges by at least six inches.
- Use painter's tape to attach the plastic to the baseboards. This creates a "tray" to catch any spills.
- Lay canvas drop cloths over the plastic. They are less slippery and absorb paint better than plastic.
Protecting the walls is also very important. Tape plastic sheeting to the top of the wall where it meets the ceiling. Let it hang down to the floor. This creates a full shield against paint spray. For more tips, check out our guide on how to prepare walls for painting.
Cleaning and Fixing the Ceiling Surface
Once your room is covered, you can focus on the ceiling. Paint needs a clean and solid surface to stick to. If you skip this, you might get a blotchy look or have chunks of texture peel off.
Start by gently removing dust and cobwebs. A soft brush or a vacuum cleaner brush attachment works well. Be gentle, as the texture can be delicate.
A light touch is key. The goal is to clean the surface, not scrub it. Being too rough can knock the texture loose, creating more repair work.
Next, look closely at the ceiling for any problems like:
- Small cracks or holes
- Water stains from old leaks
- Areas where the texture is missing
Use a putty knife and spackling to fill any cracks or holes. For water stains, you must use a special stain-blocking primer on those spots before you paint the whole ceiling. This is the only way to stop old stains from showing through the new paint.
Choosing the Right Paint and Primer
The products you choose are just as important as your prep work. Popcorn ceilings are very absorbent. The wrong paint can make the texture wet and heavy, causing it to fall off.
Think of an unpainted popcorn ceiling like a dry sponge. The first liquid it soaks up will have the biggest effect. This is why choosing the right primer is so important.
Why Primer Is a Must-Do Step
For popcorn ceilings, especially in older homes around Carmel or Pacific Grove, a good stain-blocking primer is your best friend. These ceilings often have old water spots or smoke stains that will show through regular paint.
An oil-based primer is usually the best choice. It seals the bumpy texture and creates a solid barrier. This keeps the texture from getting wet and peeling off with your roller. To learn more, read our post on what paint primer is used for.
An unprimed popcorn ceiling is the top reason these paint jobs fail. A quality oil-based primer locks the texture in place so your paint goes on smoothly without causing damage.
Picking the Perfect Paint
Once the ceiling is primed, you are ready for the paint. For popcorn ceilings, the paint's finish is as important as its color.
You should use a flat or matte finish paint. These sheens do not reflect light. This makes them great at hiding small bumps and shadows on a textured surface. A glossy paint would highlight every single flaw.
Look for a high-quality, thick ceiling paint. It might cost a bit more, but good paint covers better. This means less time painting over your head.
When you buy paint, always get about 15-20% more than you think you need. The bumpy texture has more surface area than a flat ceiling and will use more paint.
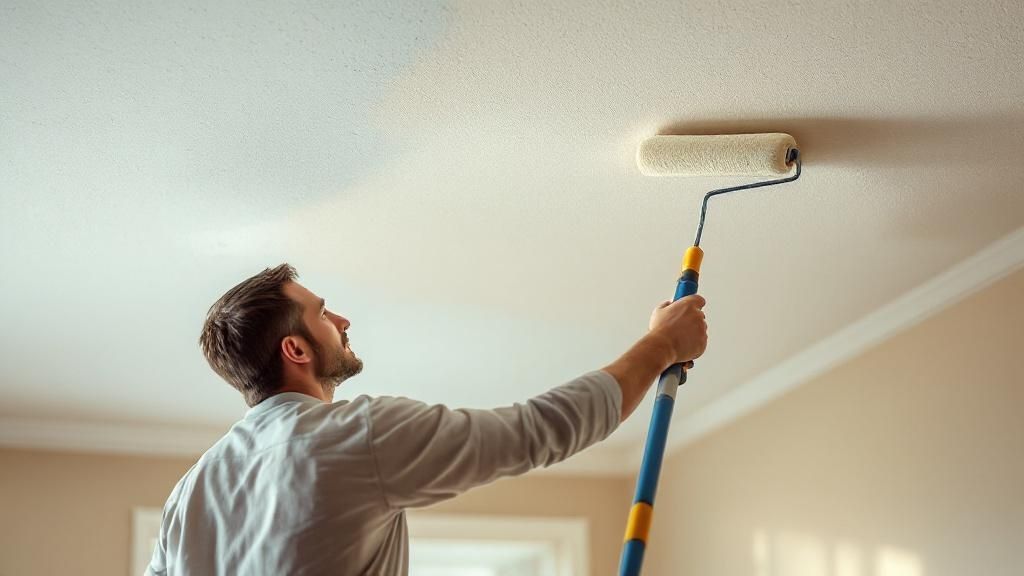
Mastering the Best Painting Techniques
Painting a popcorn ceiling is not like painting a flat wall. The bumpy surface needs a different method to get even coverage without pulling chunks of the texture down. It all starts with the edges.
Cutting In For Clean Edges
Before you use a roller, you need to "cut in." This means carefully painting the edges where the ceiling meets the walls. Use a good angled brush to create a clean, sharp line around the ceiling.
Work in small sections of about three to four feet at a time. This technique, which we use on homes in Pacific Grove, helps you keep a "wet edge." This means the paint you brushed on is still wet when you start rolling, so everything blends together smoothly.
How to Use a Roller the Right Way
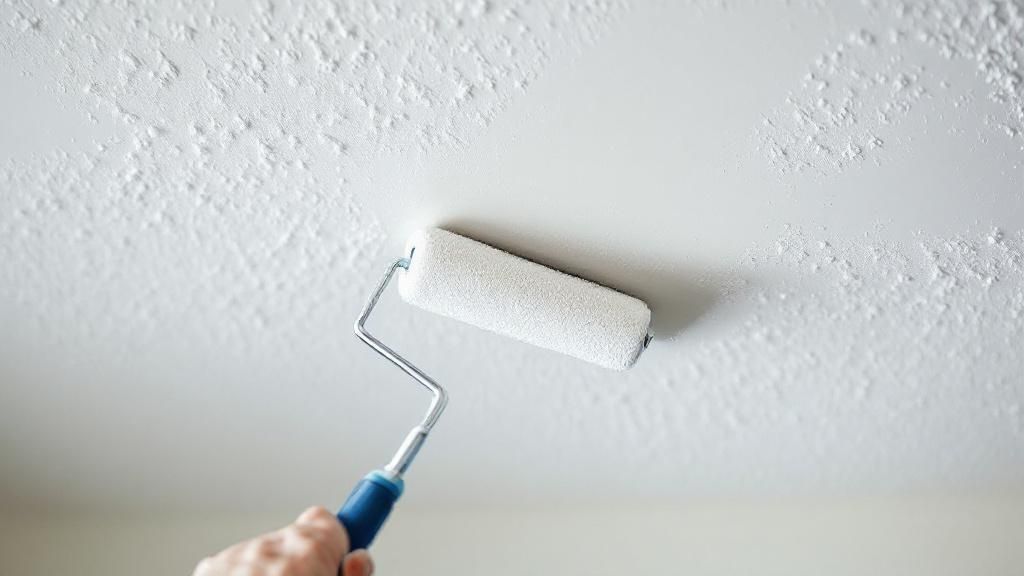
Now for the main part: the roller. The most important tool for this job is a thick-nap roller cover, one with a nap between 1/2" to 3/4". This thick, fuzzy texture is needed to push paint into all the little cracks of the popcorn surface. For perfect coverage, we recommend a high-nap Purdy Colossus roller sleeve.
The biggest mistake people make is pressing too hard. Let the roller do the work. Too much pressure can make the texture too wet, and it can tear right off. Then you have to do repairs instead of painting.
To load your roller, dip it in your paint tray and roll it back and forth until it's coated but not dripping. An overloaded roller will cause a mess. And while a few drips can happen, knowing how to fix paint drips can keep your project looking professional.
Roller vs. Sprayer: Which Is Right For You?
Rolling is a common DIY method. But a paint sprayer is a great option, especially for large spaces. Deciding between a roller and a sprayer depends on your project size, budget, and comfort with the tools.
Roller vs. Sprayer: A Quick Comparison
| Feature | Paint Roller | Paint Sprayer |
|---|---|---|
| Speed | Slower, careful work. | Much faster, covers large areas quickly. |
| Prep Time | Less prep; mainly covering things. | Lots of prep; everything must be covered. |
| Cost | Low cost and easy to find. | Higher cost for the sprayer itself. |
| Control | Great control, less mess. | Can create a lot of overspray. |
| Finish | Good, but can loosen texture. | Excellent, perfectly even coat. |
| Ease of Use | Easy for beginners. | Takes practice to avoid drips. |
For most people painting one room, a roller is the easier choice. But if you are painting the whole house, a sprayer can save a lot of time.
How to Fix Common Popcorn Ceiling Problems
Even if you do everything right, popcorn ceilings can be tricky. A small problem can feel like a big deal, but most issues have simple fixes. Knowing how to solve problems as they happen is key.
One of the scariest moments is seeing the popcorn texture peel off with your roller. If this happens, stop painting right away. Don't try to keep going. This usually means the ceiling was never primed or has water damage.
Dealing with Peeling Texture
When the texture comes loose, use a putty knife to gently scrape away all the peeling parts. You need to get back to a solid surface. Once scraped, let the area dry completely.
After it's dry, it's time to patch. You can use a spray-on popcorn ceiling patch to blend the repair with the existing texture. Once the patch is dry, you must spot-prime the repaired area. Use a good oil-based primer to seal it. For more details on prep, see our guide to professional drywall preparation.
Fixing Roller Marks and Stains
Visible roller marks, or "lap lines," are another common problem. They happen when you paint over a section that has already started to dry. To fix this, apply another thin coat of paint. This time, make sure each new roller stroke slightly overlaps the last one while it's still wet.
What if old stains bleed through your new paint? Don't just add more paint—it won't help. This means the stain wasn't sealed correctly.
Let the first coat of paint dry completely. Then, cover the stain with an oil-based, stain-blocking primer. Once the primer is dry, you can apply your final coat of paint for a perfect finish.
Frequently Asked Questions (FAQs)
It's normal to have questions before starting a big project like painting a popcorn ceiling. Here are answers to some common questions we hear from homeowners in the Salinas and Carmel area.
1. Can I paint over a popcorn ceiling that has already been painted?
Yes, you can! In fact, it's easier. An old layer of paint seals the texture, making it less likely to get wet and peel off. You'll still need to clean it well, but you can probably skip the primer and go straight to your new paint color.
2. How do I know if my popcorn ceiling has asbestos?
If your house was built before the 1980s, you must check for asbestos. You can't tell just by looking. The only way to know for sure is to have a small sample tested. You can buy a home test kit or hire a pro for safety. Do not scrape or sand the ceiling until you know it's asbestos-free.
3. What is the best roller to use for a popcorn ceiling?
You need a roller with a very thick nap, between 3/4-inch and 1 1/4-inch. This type of roller holds a lot of paint and pushes it into the bumpy texture without needing too much pressure. A thin roller will give you a blotchy, uneven finish.
4. Help! The popcorn texture is coming off on my roller!
This is a common problem, usually on ceilings that have never been painted. When water-based paint hits the raw texture, it can dissolve the adhesive holding it up. The only good fix is to use a stain-blocking, oil-based primer first. This creates a barrier and protects the texture.
5. Should I use a paint sprayer instead of a roller?
A sprayer can give you a great, fast finish. But the prep work is huge. You have to cover everything in the room to protect it from overspray. For most people painting one or two rooms, a good thick-nap roller is the better and easier choice.
Ready to get your ceilings looking fresh but feeling a bit overwhelmed? The pros at Legacy Painting & Renovating Inc. are here to help. Contact us today for a free estimate on your interior painting project anywhere in Monterey County.