It's a frustrating sight for any homeowner: a fresh coat of paint looks great one day, but then bubbles start to appear. What's going on?
The simple answer is that the paint is losing its grip. What causes paint to bubble is a loss of adhesion between the paint film and the surface underneath it. Think of it like trying to stick a decal on a dusty or damp surface—it just won’t hold. This failure almost always comes down to one of three culprits: moisture, heat, or a poorly prepared surface.
Understanding these causes is the first step to a permanent fix. In this guide, we'll explain why paint bubbles form and how to repair them correctly, ensuring your home in Salinas, Monterey, or surrounding areas stays beautiful.
How to Identify Different Types of Paint Bubbles
Figuring out why the paint is failing is key to solving the problem for good. Those bubbles are a clear signal that something is actively pushing the paint away from the wall, breaking the bond needed for a smooth, lasting finish.
Quick Diagnostic Chart
To get a head start on your diagnosis, check the table below. The way a bubble looks and where it shows up can tell you a lot about what went wrong.
| Primary Cause | Bubble Characteristics | Common Locations |
|---|---|---|
| Moisture | Soft, spongy, and sometimes watery when poked. Can form in large, irregular patches. | Bathrooms, kitchens, basements, around windows, or on exterior walls with leaks. |
| Heat | Smaller, harder, and more brittle blisters. Often appear in clusters. | Exterior walls in direct sun (especially dark colors), or near heat sources like radiators. |
| Poor Prep | Widespread peeling or flaking along with bubbles. The paint may come off in sheets. | Anywhere paint was applied over dirt, grease, glossy surfaces, or old, failing paint. |
This table is a great starting point, but let's dive deeper into what these issues look like in the real world.
What's Happening Beneath the Surface?
Moisture is the most common enemy of a perfect paint job. When water or humidity gets trapped behind a layer of paint, it wants out. As it tries to evaporate, it turns into vapor and pushes outward, physically lifting the paint film away from the wall. This creates those all-too-familiar pockets and blisters.
It’s especially common in high-humidity areas. Think about bathrooms without proper ventilation, kitchens with lots of steam, or basements, which can be prone to dampness in the Salinas Valley.
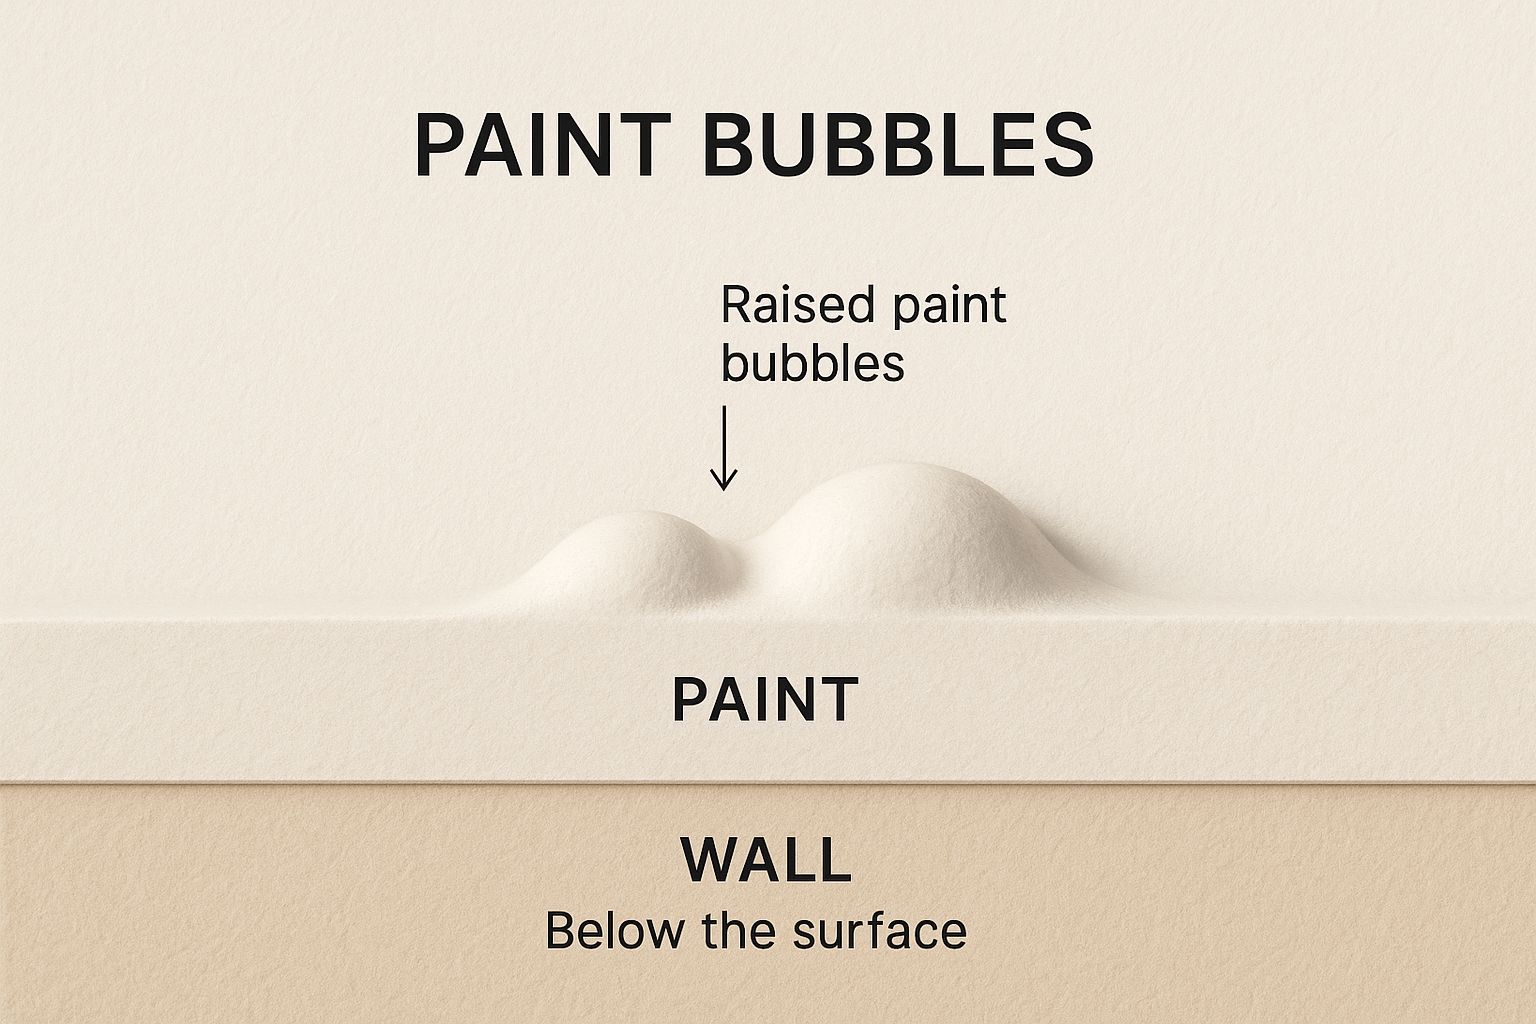
This image gives you a perfect cross-section of what’s happening. The pressure from beneath the surface forces the paint outward, creating the bubble. It's a clear illustration that this isn't just a surface-level cosmetic issue—it's a sign of a deeper problem that must be fixed before repainting.
For more expert advice from our team, check out our guide on home painting tips and how to get a free quote for your project.
Moisture: Paint's Public Enemy Number One
When it comes to paint problems, moisture is the most common and destructive issue we see on jobs throughout the Monterey Peninsula.
Think about a lid rattling on a boiling pot of water. That’s a perfect picture of what causes paint to bubble. When moisture gets trapped behind a paint film, it turns into vapor and has to escape. This pressure physically shoves the paint off the wall, creating those infuriating blisters.
This happens whenever water gets into a surface—from inside or out—and is then sealed in with a fresh coat of paint. With nowhere else to go, the moisture pushes its way out, taking your new paint job with it.
Common Sources of Interior Moisture
Inside a home, the usual suspects are high-humidity areas like bathrooms, kitchens, and laundry rooms. In these spaces, steam and condensation are a daily reality. Over time, that moisture can work its way right into the drywall.
For many homeowners here in Salinas, a poorly ventilated bathroom is ground zero for paint failure. Every hot shower releases moisture that settles on the walls. If that moisture isn’t dealt with, bubbling paint is almost guaranteed.
Key Takeaway: The only real way to stop moisture-related bubbles is to control the source. That means improving ventilation with good exhaust fans, hunting down and fixing hidden leaks, and giving surfaces plenty of time to dry completely. These aren't just suggestions; they're non-negotiable steps for a paint job that will actually last.
Exterior Moisture and Coastal Conditions
Exterior paint has an even tougher job, especially in coastal towns like Monterey and Pacific Grove. It's in a constant fight against rain, fog, and salty, damp air, all of which try to sneak past your home's defenses.
Here’s where we see the most trouble on exterior projects:
- Leaky Gutters: When gutters get clogged or damaged, water pours down the side of the house, saturating the walls.
- Failed Caulking: Old, cracked caulk around windows and doors is an open invitation for rain to get in behind siding and paint.
- High Humidity: Our local climate means the air itself is often damp. This slows down how fast paint can dry and allows porous surfaces to absorb moisture.
These environmental factors are a massive part of why exterior paint fails. When the sun comes out, all that trapped moisture tries to escape at once, creating incredible pressure that no paint can withstand. In fact, more than 60% of paint failures on exterior surfaces are tied directly to this kind of moisture pressure. You can dig deeper into this in a detailed explanation from Paintman.co.uk.
To win this battle, you have to choose the right materials. We break down how different products hold up to our unique local climate in our guide to weather-resistant paint options.
When Heat and Sunlight Sabotage Your Paint Job
While moisture is a big-time offender, it’s not the only thing that can wreck a paint job. Painting in direct, intense sunlight is a classic mistake that also explains what causes paint to bubble, especially on exterior walls. We see this all the time on dark-colored homes in sunny areas like Carmel, which can get incredibly hot under the California sun.
Think about baking a cake with the oven cranked way too high. The outside gets crispy almost instantly, forming a hard shell while the inside is still soupy. That’s almost exactly what happens when you paint a hot surface. The top layer of paint flash-dries, trapping solvents, air, and any lingering moisture underneath. As the wall keeps baking, those trapped elements expand and push their way out, creating frustrating little blisters.
How Heat Blisters Form
Heat blisters look and feel different from the larger, softer bubbles you get from moisture. They're usually smaller, show up in clusters, and are hard to the touch. You’ll often spot them within hours—sometimes even minutes—of painting on a hot day.
This is a constant battle for us on exterior projects in communities like Carmel and Salinas. A wall that’s perfectly cool in the morning can be scorching by early afternoon, creating ideal conditions for blistering. The secret is to work with the weather, not against it.
Expert Insight: Any seasoned pro will tell you they “follow the shade” around a house. We start on west-facing walls in the morning, then move to east-facing walls in the afternoon, always staying out of direct sun. This simple strategy is one of the biggest things that separates a DIY job from a professional, long-lasting finish.
Smart Painting Practices for Sunny Climates
Beating the heat and avoiding blisters really just boils down to good timing and proper technique. If you’re planning to paint, especially with a darker color, timing is everything.
- Avoid Peak Sun: Stay out of the direct, overhead sun. As a rule of thumb, don't paint between 10 a.m. and 3 p.m. on a hot day.
- Check the Temperature: Your paint can is your friend. Always check the manufacturer's label for the recommended application temperatures. Most paints do best between 50°F and 90°F.
- Feel the Surface: It’s a simple test, but it works. If the wall feels hot to your hand, it's definitely too hot to paint. Wait for it to cool down in the evening or pick a cooler, overcast day.
Understanding how heat messes with adhesion allows you to schedule your project to give the paint plenty of time to cure the right way. That’s how you get a smooth, durable, and bubble-free finish.
The Unseen Damage of Poor Surface Preparation
If moisture and heat are the culprits attacking your paint from the outside, then poor surface preparation is the inside job that guarantees failure. A high-quality paint job is only as good as the foundation it’s applied to.
Painting over dirt, grease, or flaky old paint is like building a house on a foundation of sand—it simply won't last. This is another critical factor in understanding what causes paint to bubble. The new coat of paint isn't bonding with the wall itself; it's just clinging to a weak, unstable layer.
Eventually, even small changes in temperature or humidity will cause that unstable layer to shift, taking your brand-new paint job with it. It’s a common issue, but one that is completely preventable.
The Foundation of a Flawless Finish
For any professional painting project, whether it’s an interior refresh in Salinas or a commercial space in Monterey, preparation isn't just a step—it's the most important part of the entire process.
Professional Standard: We believe that 90% of a high-quality paint job happens before a can of paint is even opened. Skipping or rushing preparation is the single biggest mistake that leads to premature paint failure.
Problems like painting over dirty surfaces or failing to remove loose paint are a leading cause of bubbling. As you'll see in professional guidance on preventing paint blistering from Sherwin-Williams, industry best practices always stress careful blister removal, sanding, and fixing any moisture sources before repainting.
Prep Work That Professionals Never Skip
To ensure a paint job lasts, there are several non-negotiable steps we take on every project. Each one creates a clean, sound, and perfectly prepared surface ready to bond with primer and paint.
- Thorough Cleaning: Walls accumulate dust, grease, and grime you might not even see. We meticulously clean every surface to ensure the primer can adhere directly to the substrate.
- Removing All Failing Paint: Any existing paint that is peeling, chipping, or bubbling must be completely scraped and sanded away. Painting over it just hides a problem that will reappear.
- Sanding for a Smooth Surface: After scraping, we sand the area to feather the edges. This creates a seamless, ultra-smooth surface so the final coat looks perfectly uniform.
- Applying the Right Primer: Primer is the "glue" that holds everything together. It seals the repaired surface and creates the ideal texture for the topcoat to grip onto securely, ensuring a lasting bond.
To see how this commitment to quality translates into a job that stands the test of time, you can learn more about why quality paint and prep work matter for a long-lasting finish.
Your Step-By-Step Guide to Fixing Bubbled Paint
Knowing what causes paint to bubble is half the battle; now it’s time to win the war. Tackling bubbled paint isn't as simple as scraping it off and slapping on a new coat. If you want to make sure the problem is gone for good, you have to follow a methodical, professional process.
This is the exact approach our experts at Legacy Painting & Renovating Inc. use to guarantee flawless results on every project we touch.
The Professional Repair Process
To permanently fix those frustrating paint bubbles, you must correct the visible damage and address the root cause. This step-by-step guide walks you through the same process our teams use in homes all across the region, from Salinas to Carmel.
-
Scrape and Remove All Loose Paint: Grab a putty knife or a good scraper and carefully work off every bit of the bubbled, peeling, or loose paint. You have to get back down to a solid, stable surface.
-
Sand for a Seamless Finish: Once all the loose paint is gone, sand the edges to “feather” them out. This creates a smooth, gradual transition between the repaired spot and the surrounding wall, making the fix invisible.
-
Clean the Surface Thoroughly: All that scraping and sanding kicks up dust. Wipe down the entire area with a damp cloth to get rid of every last bit of dust and debris. Painting over a dusty surface is a surefire way to have adhesion problems again.
-
Address the Root Cause: This is the most critical step. If moisture was the culprit, find and fix the leak or improve the room's ventilation. If it was heat, plan to paint during a cooler time of day. You must solve the underlying issue.
Key Insight: Simply painting over a problem area without fixing the source is like putting a bandage on a wound that needs stitches. The issue will always bleed through. Lasting results come from fixing the cause, not just the symptom.
-
Apply a High-Quality Primer: Now it's time for primer. Apply a coat of high-quality primer designed for your surface (drywall, wood, etc.). Primer seals the patch and creates a uniform foundation for your new paint.
-
Repaint with Quality Paint: Finally, apply two coats of high-quality paint, allowing adequate drying time between coats as recommended by the manufacturer.
Following these steps is essential for any repair, especially for projects like refreshing your home’s exterior. For a deeper dive, explore our professional guide to exterior residential painting.
Frequently Asked Questions About Paint Bubbling
It's natural to have questions when you see frustrating bubbles on your walls. Our team has heard just about every question from homeowners here in the Monterey Bay area. Here are some of the most common ones, with clear answers to help you.
1. Can I just pop the bubbles and paint over them?
No, this is a firm "no." Popping a paint bubble and painting over it is like putting a band-aid on a broken arm; it doesn't fix the core issue, which is a loss of adhesion. You must scrape off all loose paint, sand the area smooth, prime it, and fix whatever caused the bubble in the first place.
2. What is the difference between paint bubbling and blistering?
People often use these terms interchangeably, but there's a slight distinction. Blistering usually refers to larger, more prominent bubbles, often a sign of a significant underlying problem like intense heat or a moisture leak. Bubbling can describe smaller, widespread "pimples" on the surface, which are also frequently the result of an application error like painting over a dusty surface.
3. How soon after painting can bubbles appear?
This depends on the cause. Blisters from heat can show up incredibly fast—sometimes within hours—especially if you're painting a dark color in direct sun. Moisture-related bubbles are sneakier and might take days, weeks, or even months to appear as trapped water vapor gradually pushes the paint film away.
4. Does humidity in coastal areas like Carmel cause more paint bubbling?
Yes, absolutely. The persistent high humidity and salty air we get in coastal towns like Carmel and Pacific Grove create a perfect storm for moisture-related paint failures, especially on home exteriors. Using a top-tier, moisture-resistant primer and high-quality paint isn't just a good idea for coastal homes—it's essential for a finish that will last.
5. Does bubbling paint mean there is a water leak?
Not always, but it should be your first suspect, especially if the bubbles feel soft or squishy and keep coming back in the same spot. This is a classic sign of a hidden water source. If you see this kind of stubborn bubbling in a bathroom or kitchen, it might be part of a larger issue. For a closer look, check our guide on professional bathroom remodel and renovation.
Don't let paint problems undermine the beauty and value of your home. If you're dealing with stubborn paint bubbling and want a permanent, professional solution for your property in Monterey County, contact Legacy Painting & Renovating Inc. for a free, no-obligation estimate.