Painting a brick wall can completely transform a home. It brings a modern, clean look to a classic material.
But it's a big step—and a permanent one. Getting it right means doing more than just rolling on a coat of paint. It's a process of thorough cleaning, using a masonry-specific primer, and finishing with a breathable acrylic latex paint. This is the only way to get a durable, beautiful finish that lasts.
Should You Paint Your Brick Walls?
Before you think about colors, the first question is should you paint your brick at all? For homeowners in places like Carmel or Pacific Grove, a fresh coat of paint can instantly update an old brick fireplace. It can also give a home’s exterior a major curb appeal boost.
But here’s the thing: once you paint brick, there's no going back. Stripping paint from brick is an incredibly expensive, messy, and hard job. You have to be 100% sure.
Weighing the Pros and Cons
On the plus side, painted brick offers a clean, uniform look that can brighten up any space. It also seals the brick's porous surface. This makes it easier to wipe down and keep clean compared to its rough, natural state.
This new layer also acts as a shield, protecting the brick from wear and tear. However, that seal is also the biggest risk if the job isn't done right.
Brick is a natural material, and it needs to breathe. If you use the wrong kind of paint, you can trap moisture inside the brick. This is a huge concern for homes here in the coastal Monterey Bay area.
When moisture gets trapped, it leads to peeling and blistering paint. In the worst cases, it can cause serious, long-term damage to the brick and mortar.
The key takeaway is that painting brick is a commitment. A successful project enhances your home's value and aesthetics, while a poorly executed one can create long-term maintenance headaches.
The Impact on Your Home's Exterior
When you're thinking about an exterior project, it helps to look at the big picture. If painting your brick is on the table, consider how it fits in with other affordable ways to refresh your home's exterior.
Ultimately, the choice comes down to balancing your design goals with these real considerations. From our years of experience with residential exterior painting, we’ve seen that a properly prepared and painted brick surface can be a stunning feature for any home. It just has to be done right from the start.
Gathering Your Essential Tools and Materials
Before you open a can of paint, let's talk about gear. Having the right stuff on hand is what separates a pro-level finish from a project that looks DIY. Trying to jump in without the correct tools is a recipe for frustration and a finish that won't last.
First, figure out how much surface area you're dealing with. A quick measurement will save you multiple trips to the hardware store. Before buying materials, it's a good idea to estimate square footage costs for your wall to set a budget.
Cleaning and Repair Supplies
You can't paint over dirt. Brick is very porous and collects dust, soot, and grime that will sabotage your paint job before it starts.
- Wire Brush: Get a stiff one. This is for knocking off loose mortar, caked-on dirt, and the chalky white powder called efflorescence.
- Trisodium Phosphate (TSP): For interior brick, like fireplaces, TSP is a lifesaver. It’s a heavy-duty cleaner for stubborn soot and grease. Always wear gloves and safety glasses.
- Masonry Caulk: Check your mortar joints for any cracks. Fill these with quality masonry caulk to block moisture from getting behind the paint later on.
Primer and Paint Essentials
This is where you absolutely cannot cut corners. Putting standard wall paint directly on brick is like trying to paint a sponge. It just soaks it up, and the finish will fail quickly.
Expert Insight: If there's one mistake I see homeowners make, it's skipping the masonry primer. Brick is thirsty. Without a proper sealer, it will drink up your topcoat, leaving a blotchy mess that will likely peel within a year.
You need products designed for masonry. A good masonry-specific primer is non-negotiable. It seals the porous brick and gives your topcoat something solid to grab onto.
When it comes to the paint, acrylic latex paint is the industry standard for a reason. It’s tough and, more importantly, it's breathable. This lets moisture vapor inside the brick escape naturally instead of getting trapped. For maximum durability, look into elastomeric paint, which is great at bridging hairline cracks.
Choosing the right color is a big decision, too. If you’re stuck, our guide on how to choose interior paint colors has plenty of tips.
Choosing the Right Paint and Primer for Brick Walls
| Surface Type | Recommended Primer | Recommended Paint | Key Benefits |
|---|---|---|---|
| Interior Brick | Acrylic-based Masonry Primer | Premium Acrylic Latex Paint | Seals porous surfaces, offers excellent adhesion, low odor, and is easy to clean. |
| Exterior Brick | Elastomeric or Acrylic Masonry Primer | Elastomeric or 100% Acrylic Latex Paint | Provides a waterproof barrier, bridges hairline cracks, and offers superior UV resistance. |
Ultimately, selecting the right primer and paint ensures your finish not only looks great but also protects the brick for years.
Application Tools
How you get the paint on the wall depends on your project. For a big exterior wall, say on a home in Salinas, a paint sprayer is your best friend. It’s fast and lays down a beautiful, even coat.
But for an interior brick fireplace in a Monterey home, I prefer the control of a roller and brush. You'll need a thick-nap roller (at least ¾-inch) to get good coverage. Then, have a high-quality nylon/polyester brush ready to work the paint into all those deep mortar joints.
Mastering the Critical Preparation Phase
Anyone who's been painting for a while will tell you the real secret to a beautiful finish on brick isn't in the final coat. It's in the prep work. If you cut corners here, you're setting yourself up for failure. Peeling, chipping, and bubbling paint can show up in just a few years.
Professional painters often spend up to 30% of their total job time just on preparation. It’s that important. Skipping these steps can cut your paint's lifespan in half.
Cleaning the Brick Surface
First, you've got to get that brick spotless. Brick is porous, so over the years it soaks up dirt, grime, and a chalky white powder called efflorescence. Trying to paint over any of that is a recipe for disaster.
For an indoor brick fireplace, a stiff wire brush is your best friend. Scrub off all the loose bits. Then, use a solution of TSP or just soap and water, wash it, and rinse it clean with a damp cloth.
If you're tackling an exterior wall on a home in the Salinas Valley, nothing beats a power washer. But be careful—you can do more harm than good if you're too aggressive.
- Stick to a low-pressure setting, between 1,500 and 2,000 PSI.
- Keep the nozzle at least a foot away from the brick.
- Use smooth, sweeping motions to avoid digging into the mortar.
A Note on Mortar: That mortar holds your wall together. If it's old, a high-pressure blast can blow it right out. Always test a small, hidden spot first.
Repairing Cracks and Gaps
Once the wall is clean and dry, it's time to inspect it. Look over the entire surface for cracks, gaps, or crumbling mortar. These are weak points where water will try to get in.
The fix is simple. Grab a tube of high-quality masonry caulk and fill in any cracks. Smooth it out with your finger so the repair blends in. Our guide on how to prepare walls for painting dives deeper into these kinds of repairs.
Allow for Ample Drying Time
This last part is the easiest step, but it requires patience. After cleaning, the porous brick has soaked up a lot of water. You absolutely cannot rush this.
Trapping moisture under paint is the #1 reason for blistering and peeling. Let the brick air-dry for at least 24 to 72 hours. Here on the coast, with the humid air in Monterey or Carmel, I’d wait the full 72 hours to be safe. The wall needs to be completely dry to the touch.
Properly preparing masonry surfaces is about more than just cleaning. You can find similar principles in guides for restoring limestone patio stones, which also emphasize deep cleaning and repair before finishing.
Applying Primer and Paint Like a Professional
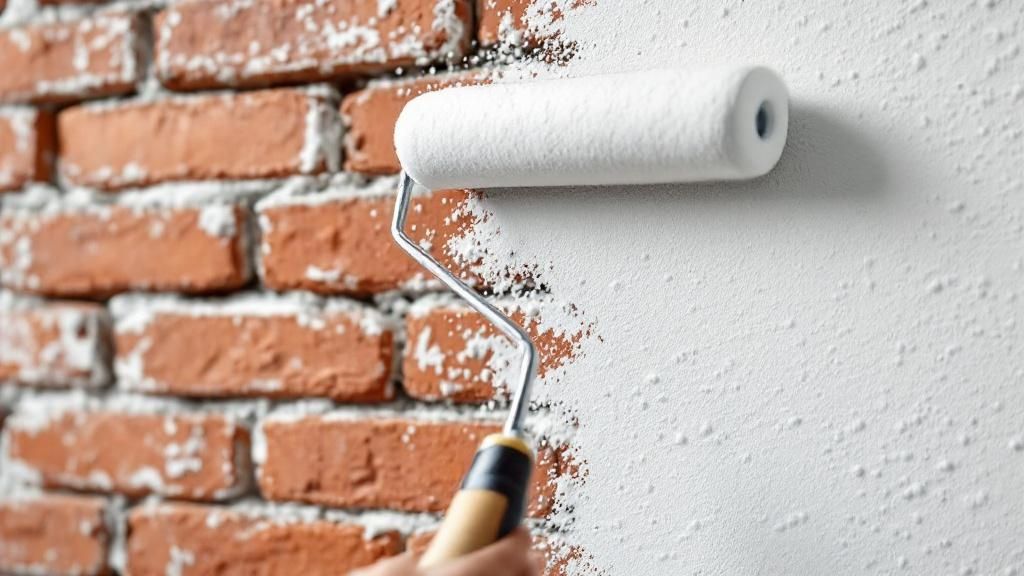
Okay, with all that prep work behind you, we're finally at the fun part. This is where the real transformation happens. But the way you apply paint to a textured surface like brick is everything if you want a smooth, durable finish.
The Non-Negotiable First Step: Priming
Let's get one thing straight: you cannot skip the primer. I’ve seen it happen, and the results are never pretty. Brick is like a sponge. If you go straight to your topcoat, it will soak up the paint, leaving a blotchy mess.
A single, even coat of a high-quality, latex-based masonry primer is key. Its main job is to seal that porous surface so your paint can adhere properly. If you want to dive deeper, we have a whole guide on what paint primer is used for.
This method forces paint into the tricky mortar lines first. Then it lets you get an even coat on the flatter brick faces. It’s the secret to a seamless look.
Choosing the Right Paint for the Job
The paint you pick is just as important as the primer. Today, 100% acrylic latex paint is hands-down the best choice for brick walls, especially for exteriors we see all over Salinas and Monterey. It's tough, durable, and most importantly, it's breathable.
Expert Tip: Breathability is the key to longevity with painted brick. Masonry naturally allows moisture vapor to pass through it. A breathable paint lets that vapor escape. The wrong paint traps it, leading to blistering and peeling.
Mastering Your Application Technique
How you put the paint on the wall depends on the size of your project. For a huge exterior wall, a paint sprayer is a game-changer. But for an interior fireplace or a feature wall, a brush-and-roller combo gives you the most control.
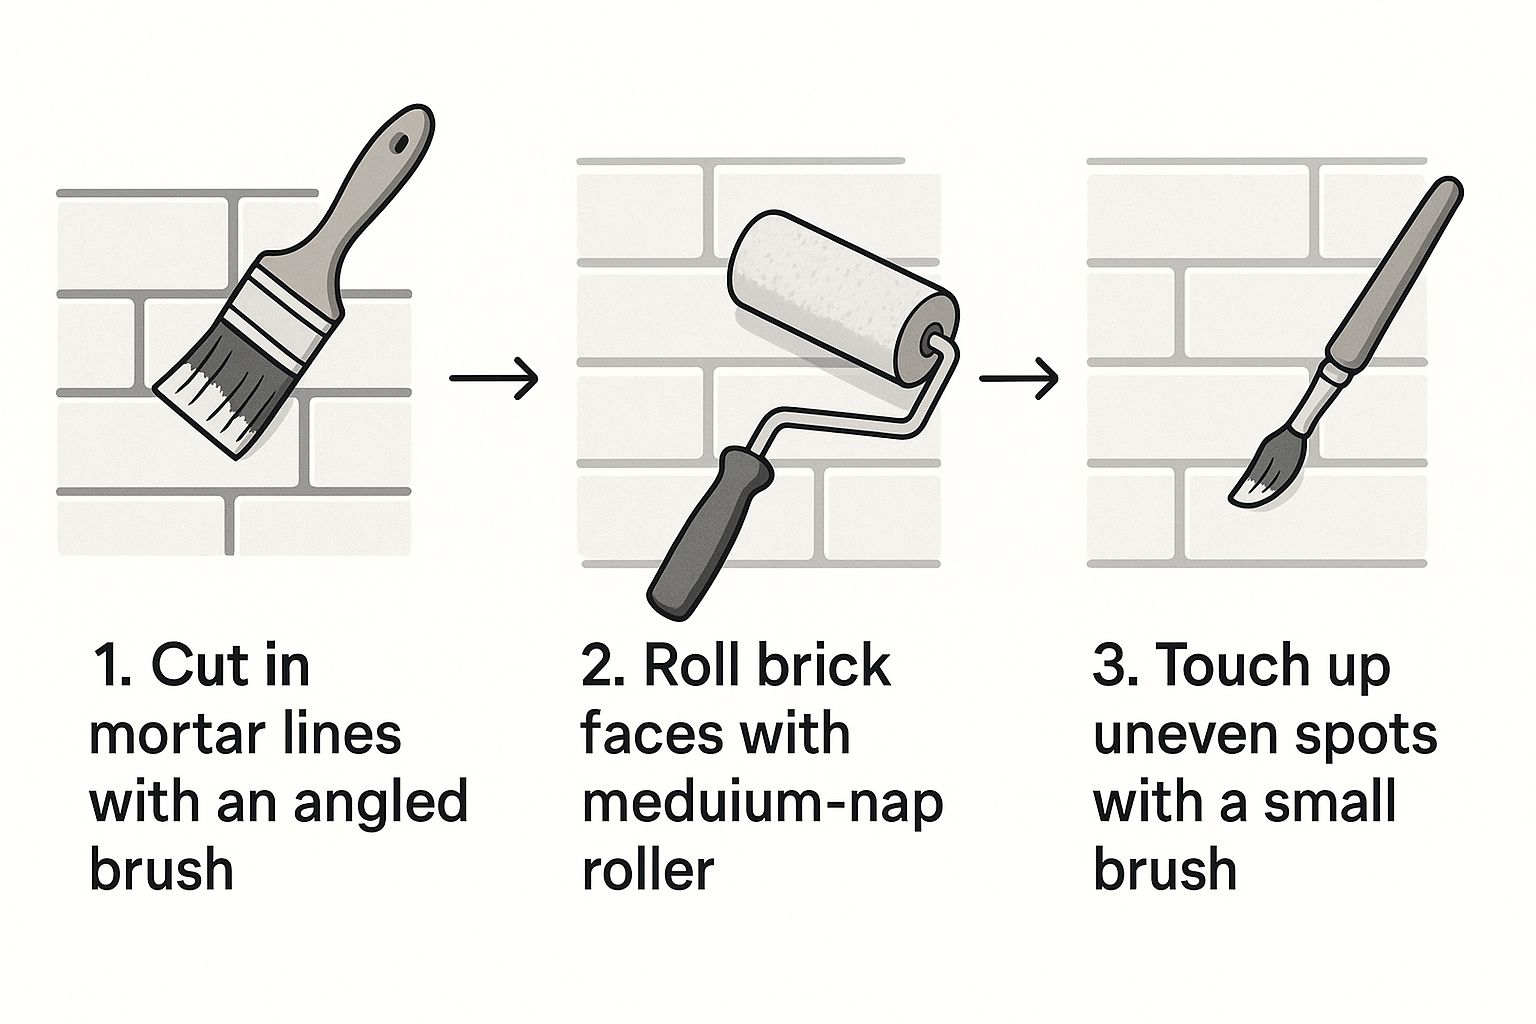
Here’s our strategy for a professional finish:
- Hit the Mortar Joints First: Grab an angled brush and work the paint deep into all the mortar lines. This step ensures you won’t have any bare spots peeking through.
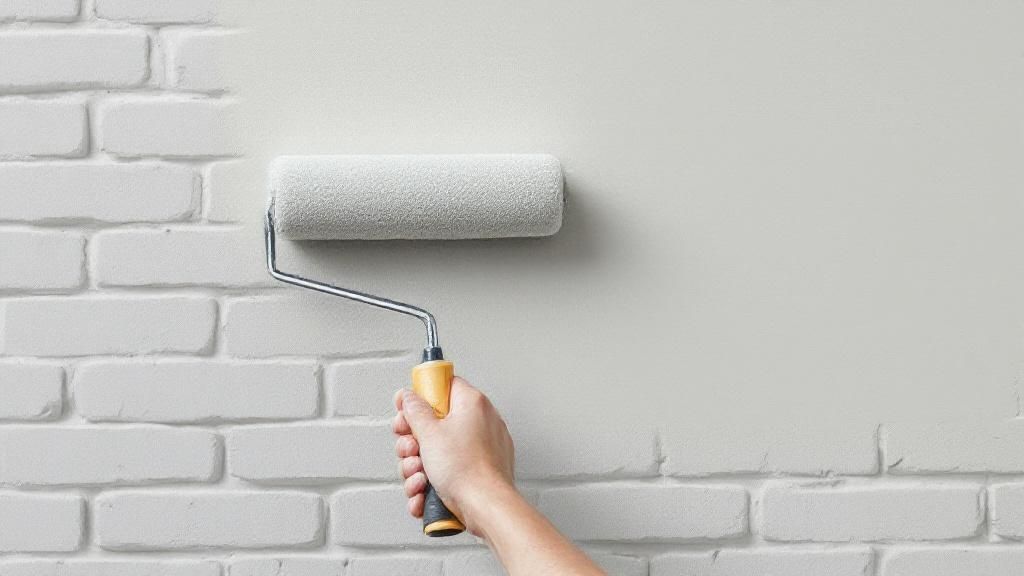
- Roll the Brick Faces: Once the joints are cut in, switch to a roller with a thick nap—at least ¾-inch. You need that thick nap to push paint into the brick's rough texture. Work in small sections to keep a wet edge.
- Two Thin Coats are Better Than One Thick One: Never try to get it all done in one go. Apply two thin, even coats. Let the first coat dry completely before starting the second.
This methodical approach guarantees every inch of your brick gets a perfect, even coating.
Finishing Touches and Long-Term Maintenance
You’ve applied the final coat of paint, and the wall looks fantastic. But a few final steps are crucial for locking in that professional look.
Take a walk around and inspect your work from different angles. If you spot any drips, now is the time to tackle them. Our guide on how to fix paint drips can walk you through smoothing them out.
Curing Time and Cleanup
A little patience pays off here. Your paint might feel dry to the touch in a few hours, but it needs to fully cure. Curing is the process where the paint film hardens and reaches maximum durability.
- Keep Things Clear: For interior walls, wait at least 72 hours before furniture touches the new surface.
- The Full Cure: Most acrylic paints take about 30 days to harden completely. During this time, avoid aggressive scrubbing.
Once you’re done painting, carefully remove the painter's tape while the last coat is still a bit tacky. This is the secret to getting crisp, clean lines. Clean your brushes and rollers so they’re ready for the next project.
A Strategy for Long-Term Care
A well-painted brick wall is very durable. But a little proactive care goes a long way. We recommend a quick annual inspection to keep your Monterey home’s painted brick looking its best.
Once a year, just do a simple walk-around and keep an eye out for any signs of cracking or peeling. Catching a small issue early is much easier than dealing with a major repair later.
For routine cleaning, a soft cloth with mild soap and water is all you’ll need. Avoid abrasive scrubbers or harsh chemicals. With today's coatings, a quality paint job can look great for up to 15 years.
Frequently Asked Questions About Painting Brick Walls
Here are answers to the most common questions homeowners in Salinas, Monterey, and Carmel ask us about painting brick.
1. What kind of paint is best for brick walls?
Your best bet is a top-quality, breathable acrylic latex paint made for masonry. For exterior projects in coastal spots like Monterey, we often use an elastomeric paint. These paints are flexible and let moisture escape from inside the brick, which prevents peeling.
2. Can I paint over previously painted brick?
Yes, you can, but prep work is key. You have to scrape and sand away all loose or peeling old paint. A perfectly clean surface is non-negotiable, so wash the wall to remove dirt and grime. If the old paint has any shine, lightly scuff the entire surface with sandpaper so the new primer can grip it.
3. Do I absolutely need to prime brick before painting?
Yes. Priming unpainted brick is a critical step. Brick is very porous and will soak up your topcoats, leaving a blotchy finish. A quality masonry primer seals the surface, ensures a strong bond for the topcoat, and blocks stains from bleeding through.
4. How do you clean a brick wall before painting?
For an interior brick fireplace, use a stiff wire brush to knock off loose debris. Then, wash with a TSP solution or simple soap and water. For exterior brick, a pressure washer is best. Use a moderate setting (1,500 to 2,000 PSI) so you don't damage the brick. Always let the brick dry completely for 24 to 72 hours before painting.
5. Is it better to roll, brush, or spray paint on brick?
It depends on the project size. For big exterior walls, a paint sprayer is fastest and gives even coverage. For most interior jobs, like a fireplace, a team approach works best. Use a thick-napped roller for the flat brick faces and an angled brush to work paint into the deep mortar joints.
Feeling ready but think you'd rather leave it to the pros for your Salinas or Monterey home? The team at Legacy Painting & Renovating Inc. is here to help you get that perfect painted brick finish without any of the hassle. Reach out today for a free, no-obligation estimate and let our experts bring your vision to life.